TABLE OF CONTENTS
- What do the areas mean on the Client Portal home screen?
- Take a look around the Client Portal home screen
- How does the Client Portal work?
- Online Payment of Invoices by your Clients
- How do my Clients get Access to the Client Portal?
This article explains all of the areas of the Home screen of the Client Portal.
What do the areas mean on the Client Portal home screen?
Navigation: Click the link "go to portal" from any Client's account

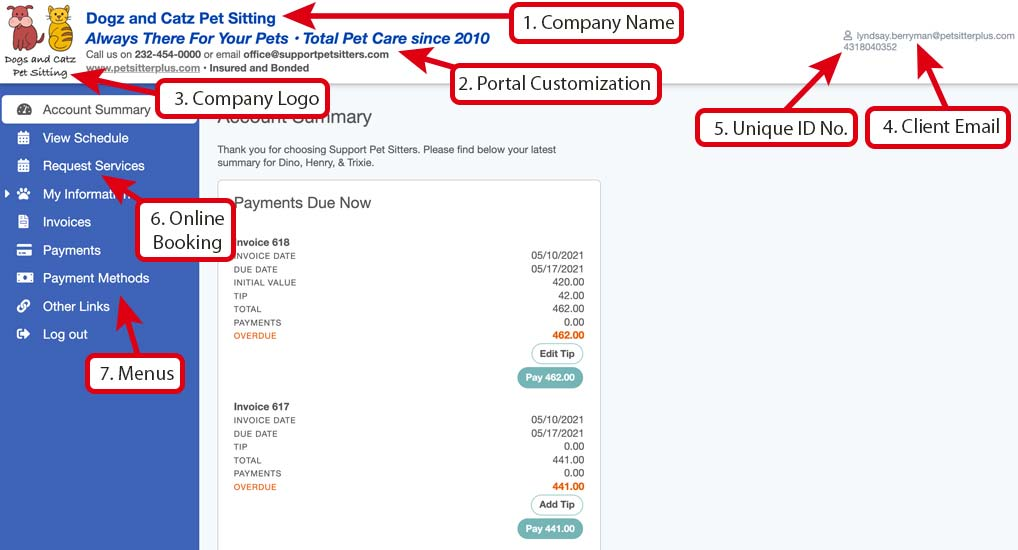
Take a look around the Client Portal home screen
1. Portal Customization If your company name features in your logo you probably won't want to show it twice in this section. See Customize your Portal with you Company Branding. |
2. Company Logo You can add your own branding to the Client Portal by adding your logo. See How do I Add my Company Logo? for instructions on how to upload this. |
3. Client Email The client email will appear as it has been entered into the client account. See How do I Add a New Client? |
4. Unique Account No. Pet Sitter Plus automatically allocates a unique 10-digit account number to each new client account that is created. This can be used by the client to login to the system instead of using their email address. The account number can also be used in email correspondence by using the merge code {CLIENT_ACCOUNT_NUMBER}. See Understanding Email Templates and Merge Codes to understand how they work throughout Pet Sitter Plus. |
5. Online Booking (Request Services) You can choose whether you want to allow clients to book online through the Client Portal. To enable this option, you will need to ensure certain settings are switched ON. See How do I Allow Clients to Order Services Online? |
6. Menus The client portal menu options can be accessed here. The only menu that can be hidden is the "Your Data" menu. See How Can I Give My Clients Access to Their Client Portal? and Client Portal Settings. The Payment Methods menu only appears when you have Stripe connected so clients can pay online. |
How does the Client Portal work?
Your clients will be able to log into their account using either their unique Account ID or their email address plus a password. The portal can be accessed from a computer or smaller devices.
Once logged into the Portal your clients can:
- view and update their contact details and information about their pets, including uploading photos and documents if you have enabled this option.
- view the services (jobs) which have been scheduled for them in Pet Sitter Plus - see How Can a Client View Their Schedule in the Client Portal?
- Cancel scheduled services (if you have enabled this option).
- Request services to be scheduled for them in Pet Sitter Plus (if you have enabled this option).
- view their account summary and pay online (see below).
- view or download invoices created in the last 12 months.
- view a list of all payments they have made to you.
Online Payment of Invoices by your Clients
The Client Portal also gives you the option to allow some or all of your clients to:
- make payments with their debit or credit card via your Stripe account.
- set up their debit or credit card details so you can collect their payments automatically from Pet Sitter Plus into your Stripe account.
- set up their bank account for you to take payments from (US only) via ACH.
Note: This does not affect any existing payment methods, such as direct bank transfers or BACS, checks or cash, which your clients will still be able to use.When a client pays their invoice online, a receipt will automatically be posted for that client in their Pet Sitter Plus account so you will no longer need to post manual receipts for these transactions.
How do my Clients get Access to the Client Portal?
There are different ways for new and existing clients to login to their client portal so that they can access their account:
- Simply advise the client of the web link (URL) they need to use and provide them with their unique ID - used for existing clients. See How Can I Give My Clients Access to Their Client Portal? They can then enter their password to complete the login process.
- Add a login button to your own website that your existing clients can click to access the portal. You will still need to provide your clients with their login ID.
- Add a register button to your own website for new clients to gain access to the portal for the first time.
See Registration and Passwords for more information.
Was this article helpful?
That’s Great!
Thank you for your feedback
Sorry! We couldn't be helpful
Thank you for your feedback
Feedback sent
We appreciate your effort and will try to fix the article